A great evening to all!
The last two evenings after work have been
spent at the store getting ready for
S U M M E R T I ME
Will have to share photos soon of our window display.
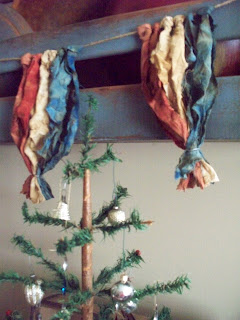
Tonight I would like to share my prim
Americana Bunting.
I created these 3 prim buntings using muslin.
For those who would like to make some for yourself,
this is how I did them.
Materials list at end of post.
For each banner
Cut 6 strips of muslin into 12 x 1 and 3/4" strips.
Using an old coffee cup, heat 1 cup of water
in your microwave for 1 minute.
Add 5 heaping TBS of instant coffee and then
add some cinnamon...enough shakes to make it smell nice.
Let sit for a minute to rest the cinnamon.
Using an old cookie sheet pan, line with wax paper.
Next grab yourself 2 more old mugs or throwaway Solo cups.
Add your coffee mixture to each of the cups.
Now add your paint.
I just squeezed the colors into each cup until
I liked the color of each.
Stir up the coffee/ paint mixture with an old paintbrush.
Now add 2 strips to each cup until covered.
(wear rubber gloves if you do not want painted hands)
I like to get paint on mine. LOL
Take the strips out and squeeze until a bit dry.
(If the color is too dark, rinse under cold water)
(If too light, add more paint, mix and re-do strips.
Place the dyed strips onto your cookie sheet,
keeping the colors separate from each other.
Since I did 3 banners, I did each color separately,
changing the wax paper after each color.
*** remember these instructions are for 1 banner***
{ I made 3 banners all at once }
Bake for 10 minutes @ 225 degree oven.
Baking time may differ depending on your oven.
Just keep baking until dry.
(if you prefer to air dry, then it will take overnight)
Next make yourself another cup of coffee with cinnamon.
Once your strips are dry,
add both the red and then the blue to this mixture
and squeeze out excess.
This time add your remaining 2 muslin strips as well.
This will be your prim white colored one.
Again either bake or air dry.
Now for the assembly.
Attach each strip to twine using the Macrame
Lark's Head Knot.
If you Google this you will see how it is done.
For each banner add 2 red, 2 white and 2 blue.
Once you have the amount of banners
you want tied to your twine,
turn entire strand over on a flat surface.
(table would be fine)
Gather together each banner & using 6 strands of floss,
tie a knot 2 inches up from the bottom.
This is why you turned the strand over...
so you cannot see the knot.
Now you are ready to hang your banner(s)!
Material List
Muslin
Craft blue & red paint
(I used Craft Essentials Blue Velvet & Dark Red from JoAnn)
Instant coffee
Cinnamon (I used Dollar Store brand)
3 old coffee mugs or Solo cups
Paintbrush
Cookie Sheet Pan
Wax Paper
Off White Embroidery Floss
Twine
Hope you were able to follow my tutorial
and enjoyed my prim banner look.
Am working on my second Summertime tree,
and will have another tutorial on one of the items I am creating for this one.
Enjoy your evening.
Americana Blessings To All!
Janice


It's an interesting idea... thanks for sharing...love it..
ReplyDeletecool project!
ReplyDeleteHi Janice,
ReplyDeleteGreat tutorial!! Your buntings look so wonderful with your bowls and bowl rack, and also with the rest of the display!!
Love the colors together!!
Hope you enjoy your week!
Heart Hugs~
Julie
great idea for sure and it looks great.
ReplyDeleteCathy
love it!
ReplyDeleteWhat a crafty and primitively adorable idea. (if that makes sense)...they look amazing...thanks for sharing the directions
ReplyDeleteSuch a creative and wonderful bunting.
ReplyDeleteWonderful tutorial!
ReplyDeleteThank you for posting!
It would look great around a basket rim too!
Oh my Janice, these prim buntings are so cool!! I love the muted colors and your directions look easy to follow. I might try this myself and see how it goes. Your new scape looks very festive for the season!!
ReplyDeleteWhat a neat idea! I love it and saving it to try!
ReplyDeleteThese banners look wonderful!!! What a great idea!
ReplyDeleteRobyn
These banners look wonderful!!! What a great idea!
ReplyDeleteRobyn